I built a virtual try-on workflow from a blank project in Kaitoi Studio, with Penny, Kaitoi's resident AI creative director, and recorded the whole thing as a tutorial
The workflow in five nodes
The idea fits in one sentence: analyze first, generate second. Before any image is generated, two nodes make the AI look at the inputs and describe them, and only then does the final node generate.
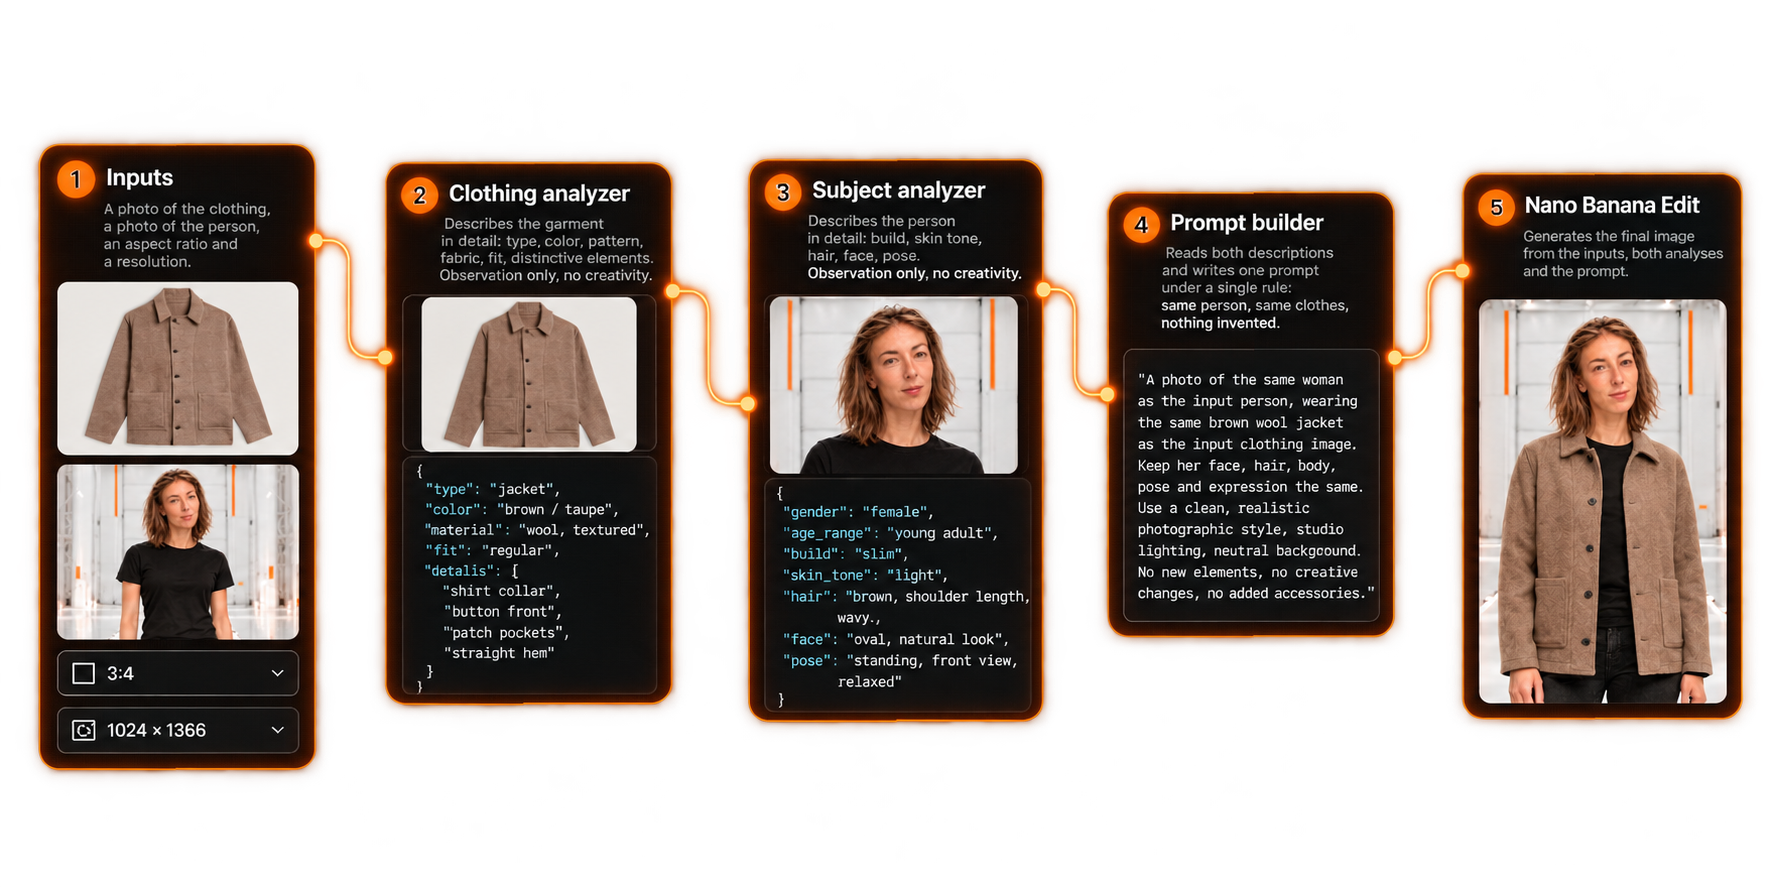
- Inputs. A photo of the clothing, a photo of the person, an aspect ratio and a resolution.
- Clothing analyzer. Describes the garment in detail: type, color, pattern, fabric, fit, distinctive elements. Observation only, no creativity.
- Subject analyzer. Does the same for the person: build, skin tone, hair, face, pose.
- Prompt builder. Reads both descriptions and writes one prompt under a single rule: same person, same clothes, nothing invented.
- Nano Banana Edit. Generates the final image from the inputs, both analyses and the prompt.
A plan first, Penny second
Penny understands natural language very well, so you can simply talk to her. What worked even better for me was using her to help structure the project, then taking it back and refining it myself. I wrote my plan in a markdown editor: what goes in, what each step does, what comes out. Markdown is a simple structured format, and it suits this kind of project because it forces you to name every input, every role and the expected result.
I pasted that plan https://pastebin.com/mZvgfPvB into Penny, and she handled the wiring. Then I tested it: first on me with a jacket, then with a hat, running all the nodes again, and finally on a different person with a different garment. Nothing in the workflow changed between tests, which is the point of a workflow.
Three lessons from the build
- Separate observation from generation. Asking one model to look and create at the same time makes it guess. Two analyzers that only describe give the generator a precise brief, and each step is easy to inspect when something looks off.
- Give the tool a plan, not a wish. "Make me a workflow" leaves everything open. Saying what goes in, what each step does and what comes out gives Penny something she can actually build.
- Keep the scope small enough to finish. I started with several ideas and cut down to one workflow I could show end to end. A short tutorial that works beats an ambitious one that does not.
One caution: asking for the exact same person is a goal, not a guarantee. The prompt asks for it, but generated faces can drift, so judge each result honestly instead of assuming it holds.
Where it is useful
Any website that sells clothes needs a photo of every piece on a model, which is slow and expensive. Give this workflow a garment and a person and you get a selling image in minutes. In the video I show what that could look like on a store page, using a mock-up shop. Next, I would like to ask Penny to turn the workflow into an app, but that is a project for another time.
What is AI-generated, and what was made elsewhere
All images in the video are AI-generated. The faces are mine and my partner's, used with both our agreements. The narration is an AI clone of my own voice, made with ElevenLabs, because my voice was hoarse when I recorded. It is credited in the video. The workflow itself, built with Penny, lives in Kaitoi Studio; the source photos, the cloned voice and the mock-up shop were made with other tools.
Try it yourself
Kaitoi Studio is in open beta and free to start: studio.kaitoi.io. Open the assistant, explore the templates for ideas, and give Penny a clear plan or ask her for ideas 🙂
© Djiiz (2026). All rights reserved.